A new Raspberry Pi Imager
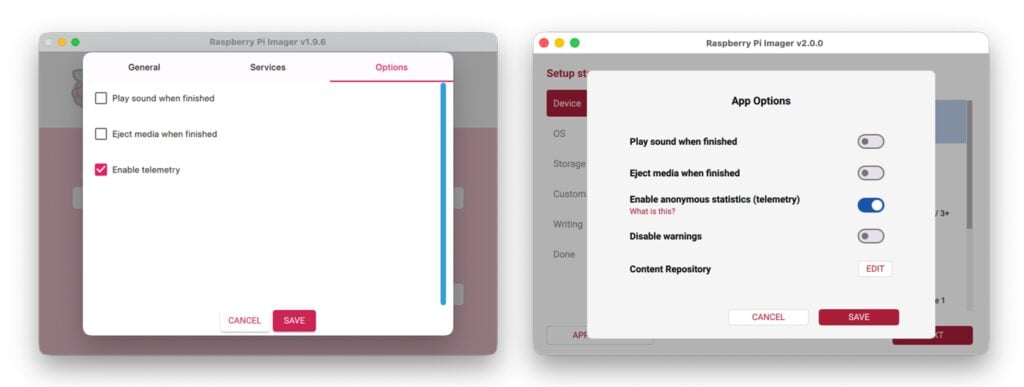
Today, I’m delighted to introduce Raspberry Pi Imager 2.0: a complete reimagining of the application that’s been brewing in our development pot for the past year. It brings a new wizard interface, the opportunity to pre-configure Raspberry Pi Connect, and improved accessibility for screen readers and other assistive technologies.
Five years ago, we introduced Raspberry Pi Imager in the hope that we could make getting started with Raspberry Pi much simpler than the typical workflow of the time. Since then, we’ve added new features, expanded customisation options, and listened carefully to your feedback. But as the application progressed, so did the strain on the interface. Eventually, the size of the customisation form grew so large that it became unwieldy. Today’s update responds to this challenge.
What’s new? Everything (almost)
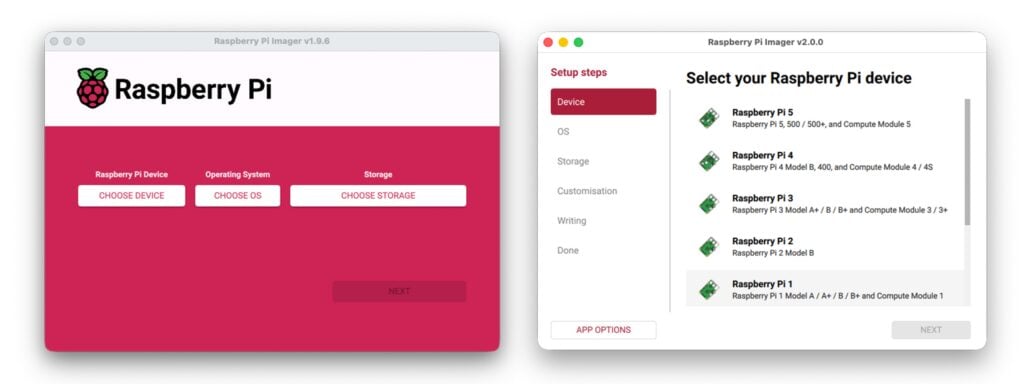
One thing was clear: for Imager 2.0, we needed to make a radical UI change. OS customisation is one of the most popular aspects of Raspberry Pi Imager, but we’d left it hidden in a separate window. Why hide the good stuff?
Separately, we had a list of features we wanted to offer, from improvements in the network installer through to wider accessibility. Following the launch of Raspberry Pi Connect, an obvious hope was to enable Connect sign-in during imaging, rather than after booting.
But what would we choose to do?
Reader, we chose all of the above.
A wizard appears
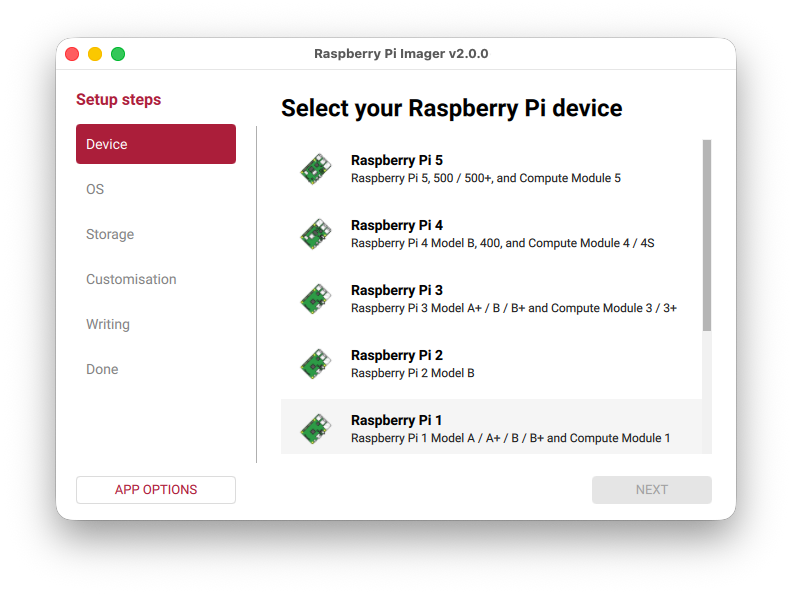
The most obvious change is the new step-by-step wizard interface. In order to make OS customisation a first-class citizen, we needed to bring it into the main interface, so now you’ll progress through a series of clearly defined stages:
- Select your Raspberry Pi device
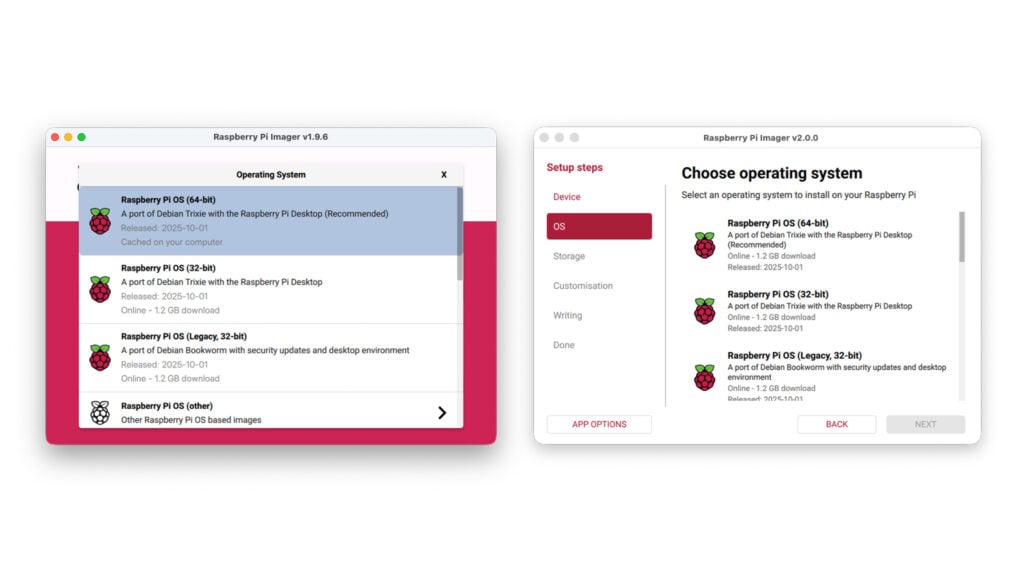
- Choose your operating system
- Pick your storage device
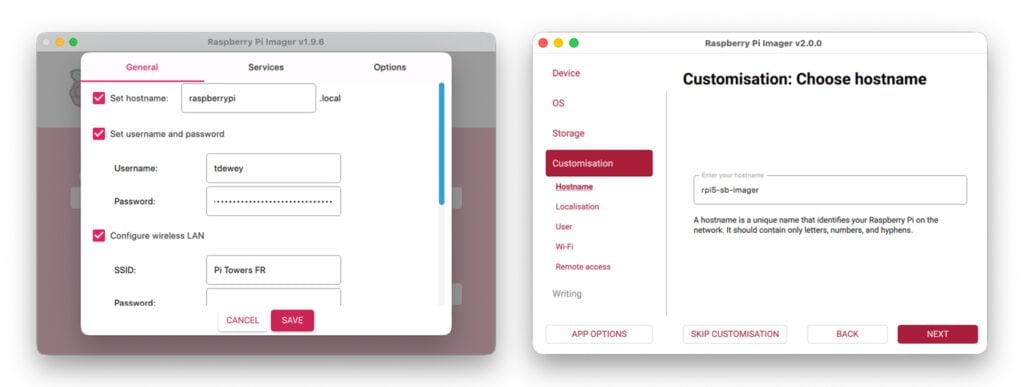
- Configure your system (hostname, location, user account, wireless LAN, remote access, Raspberry Pi Connect, and interface options)
- Write your image
- Done!
Each step gets the full window to itself, with room for helpful descriptions, validation feedback, and relevant links. It’s a more spacious, less crowded experience all round.
Raspberry Pi Connect: pre-configured and ready to go
One extremely popular customisation the original Raspberry Pi Imager offered was the ability to configure, at the point of writing your SD card, your remote access credentials, giving you the chance to pre-program your SSH public keys.
What if, however, you wanted to use the much simpler Raspberry Pi Connect? With Imager 2.0, you can do just that. Simply authenticate during the imaging process, and when your Raspberry Pi boots for the first time, it’ll already be connected to your Raspberry Pi Connect account — ready to offer screen sharing or remote shell access from the start.
Accessible by design, not by chance
Raspberry Pi Imager is a much-loved, widely used application that represents, for many people, their very first interaction with Raspberry Pi. Every user deserves the best possible experience.
Each control in the new interface includes accessibility labelling for screen readers and other assistive technologies. The entire application is fully navigable via keyboard — no mouse required. We’ve paid careful attention to colour contrast throughout, ensuring text remains readable against its background in all situations.
The new colour scheme, built around Raspberry Red, is designed to make the UI easier to read (and to draw your attention to sensible choices). We use white space generously to establish clear boundaries between controls, making the interface easier to parse at a glance.
A massive thank you to our beta testers and contributors
To borrow a phrase: “It takes a village…”.
Raspberry Pi Imager 2.0 has seen extensive changes compared to the original, with an entirely new UI, significant alterations to the core software, and numerous new features. On top of that, there are hundreds of new translatable strings!
In early October, we started publishing open beta builds — and to the users who provided feedback early and in abundance, your contributions were invaluable. You’ve made this release considerably better than it might have been.
Our community translators deserve particular thanks. Translating not only the UI but also the accessibility strings of this application is a major task, and I’m continually humbled that people freely offer their time to ensure their communities can make the most of Imager.
Finally, I’d like to extend an extra-special thanks to my two interns this summer, Ben and Paul, both of whom have made large contributions to the UI and core code of Imager. The success of this launch is in no small part thanks to their efforts, and I hope they rightly celebrate it.
What’s next?
Raspberry Pi Imager 2.0 is available now for Raspberry Pi OS, Windows, macOS, and as a Linux AppImage. You’ll find download links on our software page.
If you want to get involved in more early-access software testing, check out our beta forums.
Happy imaging!


91 comments
Jump to the comment form
Tom Dewey — post author
Something else people may want to be aware of: https://forums.raspberrypi.com/viewtopic.php?t=394045
We’ve rotated our manual verification key for the offline verification of Raspberry Pi OS. The forum post captures the major details.
Raspberry Pi Staff Ashley Whittaker
It won’t let me post the salute emoji but: *salute emoji*
James Vaccaro
using Mac Mini2 to program mem cards…
I was using a previous version of your RPI burner software that burned a memory card that had access as 192.168.0.37, which allowed complete configurabilty of the mem chip. Now, the version 2 RPI burner software programs a chip that has an unusable configuration of 127.0.1.1 which my router does not recognize and I cannot configure or customize. Why were you so eager to take away a working version 1 and put an incomplete ver 2 which does not allow for any customizations or programability?
CreatedWithATrackPoint
Love the new UI. Few questions though, will all the other OS (like ubuntu, alpine etc) still be available in the imager? And will we still have the ability to select custom OS?
PermanentPottyMouth
You could have verified it yourself in less than one minute by following the download link – but to add insult to your laziness – yes it does. All the options that were in the old installer wrt OS selection are in the new one.
Tom Dewey — post author
Broadly speaking – any OS that was selectable in the 1.9.x series releases is available in 2.0, and custom OS selection is still available – though this time with an improved native file selector.
Anthony Tunguy-Desmarais
Just upgraded to 2.0.0 and wanted to flash a SD card with retropie – I dont see that in the list on the imager. I am sure it was in 1.9?
CreatedWithATrackPoint
You can use the file provided on the Retropie website.
Harley
There is still no non-beta Raspberry Pi 5 version of RetroPie. There has never been one released. I believe if you select “Raspberry Pi 4” as the device, RetroPie should show up.
ComputerL
Yes, this will make my headless Raspberry Pi Zero set up soooo much easier!
Great improvements.
andrum99
The new UI is a a big improvement 👍Ever since the option to select which model of Raspberry Pi the user was targetting was added to Imager, the single window with buttons got a bit messy. A wizard-style UI makes much more sense now, given the various tweaks that are available.
And using cloud-init, which seems to be the defacto standard for boot-time OS customisation rather than custom scripts that only work on Raspberry Pi OS, is a welcome change.
jordana
this is indeed a substantial upgrade with a great new feature to provision Raspberry Pi Connect token! I am using a pi500 and not sure what I am doing wrong but after sign-in and create token the pop-up browser windows is empty for me and does not contain a link. I can still paste my token via Having trouble link so not so big of a deal…
Tom Dewey — post author
That’s not expected at all! Can I ask you to raise an issue on our issue tracker? https://github.com/raspberrypi/rpi-imager/issues
That will help me keep track of any changes I need to make to improve your experience.
jordana
while I understand it is not ideal to discuss matters here but I see there is already a new version out with this comment: Re-released for aarch64 to ensure a smooth upgrade path. what was strange in my case with 2.0.0 that after update I have pretty much everything – even ls command was not found from command line. Now after 2.0.1 even the browser not open when I press OPEN RASPBERRY PI CONNECT. I can still past the auth key manually so that is fine.
Terry
Dear Raspberry Pi Tower when y’all going to give Valve a call to get their blessing for a SteamOS image made available under the imager? Or maybe an Xmas edition nvme ssd preloaded with SteamOS?
Give us ARM die-hards something to look forward to for that extended down-time during the Xmas holidays after unwrapping all the Pi 500+ presents. It would be nice to be able to distract the umm, “kids”, with setting up our own Pi 500+ Steam Machines to play their Android games while us “adults” go do other constructive tasks like something … something … “seamless x86 on ARM” … something … “cross-architecture engineering experiments”.
So any chance of Eben having a heart to heart with Gabe. (Hint hint)
Bsimmo
That’s really down to Valve/Steam just making it and then making it available. Doesn’t need anything from RPi, except to tell them to add it to the list like other distro makers do.
Dave
I suppose you could try a minimal installation of FEX on top of a minimal kernel then running Steam on top of that but it’d be a huge task and you can try that now on a standard Pi now. It can be done, but I suspect you’ll be disappointed, if not agonised, by the video performance among other things, even if adding extra hardware (e.g. an M.2 to Oculink adapter, enclosure and video card). It’s well out of scope for either the Raspberry Pi foundation or Valve. I have some bits I bought myself for Christmas coming in the post and might give it a try, but I’m expecting frames per minute rather than per second. Better off to try via some engine recreation or open source port.
jack
Forced Complexity!!!
Just tested out the new interface. Many good things however, a few problems that carried over. Most of my installations are headless/lite and often use hard wired networking (no wifi). The configuration section is an all or nothing endeavor. SSH means WI-Fi, and selecting capital city instead of just country code is a bit course. Lastly, localization still does not set the “locale” so it defaults to en_GB.
I would like two changes: Country Code only (no wi-fi setup needed), and locale option settable.
Thank you
Patrick
Great update!
But having to run the Linux AppImage with sudo every time isn’t very convenient.
Are there plans to improve the Linux experience or offer native packages later on?
Thanks
Tom Dewey — post author
I remain on the look out for a better way to handle Linux elevation – on Raspberry Pi OS, we do this through a desktop file, but on other operating systems we can’t rely on as much supporting infrastructure.
Mark B
I agree about needing sudo to run. You get a big ugly terminal window in the background which you can’t close without killing the program. Clicking the ‘Back’ button goes back to the beginning (device selection) rather than one step. Organisation of the various RaspiOS flavours seems odd compared to older versions. Not keen so far but I hope it grows on me.
GreenGrass
I updated, and then uninstalled. Why capital city? Why no clear option to have no wifi, yet retain wifi details? Why no clear option to enable SSH?
Tom Dewey — post author
Selecting your capital city provides recommendations for your language, keyboard and WiFi regulatory domain. I’m not sure what you mean by no ‘clear’ option to enable SSH, given that it’s offered as an entire customisation step with a key selector and a clear option button.
I suspect your customisation needs probably exceed the remit of a tool that is unambiguously targeted at first-time users – cloud-init may offer you a richer path forward.
Anders
“reimagining” ? What is happening to Raspberry Pi?
Toly
It would be really really cool to have a TUI version of it.
Me
Some of us have ageing eyes and are extremely online. Will there be a dark mode at some point?
Tom Dewey — post author
That sounds like a feature request – I’d recommend raising it on the issue tracker: https://github.com/raspberrypi/rpi-imager/issues/new/choose
arpit
Is this built with flutter ?
Tom Dewey — post author
Raspberry Pi Imager remains completely free and open source software: https://github.com/raspberrypi/rpi-imager
Olydnad_SWE
Is.2.0.1 already out?
Tom Dewey — post author
I’m preparing 2.0.1 to respond to initial feedback, and capture late-breaking translations. It’s released on Raspberry Pi OS only, but expect to see the other platforms get builds soon.
Zandr
Not a fan of some parts of this new UI. Capital City instead of country is a weird choice, and having country selection override a timezone that was already set correctly is irritating. It’s as if the designer didn’t know there are countries with more than one timezone. I also miss being able to set a second SSH key at customization time.
Tom Dewey — post author
Capital City was chosen over country to offer a recommendation of time zone, language and most critically – WiFi regulatory domain.
I note that ‘country’ selection isn’t really good enough, particularly when you consider that the island of Reunion is considered France, despite being in the Indian Ocean.
Bryan Schaefer
This is a terrible option over the standard country design. Especially given that major cities like DC, London, & others aren’t listed. I shouldn’t have to take a geography quiz to set my timezone. Country -> city has been the standard for a reason.
Zandr
I genuinely don’t understand the point trying to make, since Saint-Denis isn’t in the Capital City list. I also don’t see that .re has its own entry in wireless-regdb.
Hob
I reverted back 1.9.6. The wizard is tedious and doesn’t remember my previous settings like 1.x did. What used to be 3 clicks now takes a dozen.
GuyPerets
What the new Content Repository edit option actually does? It’s on Raspberry Pi as default, but has Custom File and Custom URL which both asks for json.
Tom Dewey — post author
Content Repository allows you to change the device & OS list that Raspberry Pi Imager will provide in the UI. It’s covered a little more in the docs: https://www.raspberrypi.com/documentation/computers/raspberry-pi.html#IMAGER_REPO_URL
monojohnny
This look neat and well presented.
Here’s one suggestion though: you can’t jump ahead and look at the options available – you are forced into a strict path.
And on Linux: if you don’t do the ‘sudo’ to launch – this is (correctly) caught by the App to state that it requires elevated privs – but then you have to quit and start again.
Idea: instead of blocking at each step – just disable the final write step (in a clearly indicated manner) – until everything is complete and correct.
(Unless you are genuinely faced with an option that requires the previous step to have been filled-in I guess).
The reason for suggesting this: basically I’m forced to run a real installation to look at the features – it would have been nice to just have a browse-around to look at what the app offers.
Also: it might also be nice to able to generate a ‘.iso’ file – instead of just writing to a real device.
Tom Dewey — post author
A fair suggestion – the best place to handle feature requests, though, is the issue tracker (we can have a better discussion around the technical points): https://github.com/raspberrypi/rpi-imager/issues/new/choose
Gordon77
It asks you to set a name, password , city etc, then when the os is installed on a card it appears to ask for it all again ?
Tom Dewey — post author
That sounds like a customisation failure. Could you raise an issue? https://github.com/raspberrypi/rpi-imager/issues/new/choose
Thomas Goebel
Looks better…feels better…
But time for writing an image to an SD card grows terrible long…that is something which was much better in version 1.9.xx
Tom Dewey — post author
The 2.0 series releases include a change to force the operating system to confirm blocks are written as we perform the write. For certain poorly-performing card reader & card combinations, this could look like a performance drop, but it’s a performance drop in favour of hard reliability – 2.0 leaves little to chance in ensuring you get the OS you asked for.
You may want to keep an eye on the outstanding issue, where I expect to provide further details on how this mechanism can unmask unreliable card reader / card combinations: https://github.com/raspberrypi/rpi-imager/issues/1306
Thomas Goebel
Hello Mr. Dewey,
I am using an iMac with MacOs 15.7.2 with a build in card reader. Tried to get Raspberry Pi OS (64bit) on a 32GB SanDisk MicroSD Card. Writing took 35 minutes and verification another 10 minutes…all in all it took me round about 50 minutes to create a bootable SD Card for a Raspberry 5….absolutely unacceptable!
Is there a possibility to go back to imager version 1.9.x???
Kind regards
Thomas
Pablo Rodrigo
Hi Tom!
Love the new interface and workflow!!! Congrats!
On the other hand, writing a Raspberry Pi 5 Image in the Built In SD Card Reader of my M3 MacBook Pro with 48GB of RAM and macOS 26.1 is taking over an hour (has not finished yet…) Activity Monitor show it’s still writing.
Would you please review if there’s a way to speed things up?
Thanks!
Some-words-here
FYI: Raspberry Pi Imager requires macOS 12.0 or later.
I’m on macOS 10.15 (hardware too old to upgrade).
I won’t be using this for a while, I use computers until they die of extreeeem old age…
Donald
But the WiFi customisation still appears to be missing the option to set WPA3. I have to login via eth to configure this post.
Joost van Dijk
Will the new release also enable the usb-gadget feature mentioned here?
https://github.com/raspberrypi/rpi-usb-gadget?tab=readme-ov-file#using-raspberry-pi-imager
beeroid
Doesn’t this work offline? Can’t get over the “select your device” screen with blocked internet access. There is nothing to select on macos. I only wan’t to get my local images with some customisations on the card.
moode
Hi!
I’ve downloaded the latest moode image (2025-11-22-moode-r1000-arm64-lite.img) and after i selected it within the process, the step for customization gets skipped and is not available for selection. Is this not longer possible?
Thanks for the update!
Phil
If you select Moode 10 from the preset multimedia OS options it will download and allow you to customise its credentials, etc.
To the rpi-imager devs: why can we no longer customise local img files?
Tom Dewey — post author
Unlike previous versions, Imager 2.0 has a supported way of offering customisation for custom images. Details are in GitHub – and in other answers to questions here.
https://github.com/raspberrypi/rpi-imager/issues/1302#issuecomment-3574874642
Mario
Is the customisation changes supposed to affect the CLI –first-run-script? I have my own firstrun.sh and don’t see a problem with me explicitly taking responsibility on what to apply on a specific image.
Because it doesn’t work with 2.0.
Yusef Nizi
This may have been fixed by now, but I noticed the Raspberry Pi imager doesn’t seem to support Retropie anymore, however it DOES still show up as a category when you choose “no filtering-show every possible image”, however does not actually allow you to download.
Brent
I’ve noticed with the new imager that when using a custom OS the customisation is greyed out and skipped.
So you are not able to apply your on username, password, wifi ect like you would be able to do in the prior versions.
Tom Dewey — post author
Customisation of custom image files was never truly supported – it was possible only by means of a defect, and that defect was somewhat dangerous – Imager had no way of knowing if the customisation was appropriate for your custom image.
Imager 2.0 resolves that defect, and offers the ‘Content repository’ mechanism as a replacement. This mechanism allows you to annotate your custom images in the same way OS vendors do for the main OS repository – giving you every power of the official OS list.
Mark Adler
This thing doesn’t work at all. (Yes, I’m filing an issue on github.) However, I don’t have time to be a beta tester. Where can I go to download the old imager?
Mark Adler
Never mind on that last part. I found 1.9.6 on github.
Alex Mondale
Could you share whether an Android version is planned or under consideration?
Tom Dewey — post author
Unfortunately, it’s not a platform I’m looking at today. Android would present an entirely different permissions model, and a very different interaction model to the desktop – all of which means I’d consider an Android application likely in the context of a different, standalone, mobile application.
NarutoSenkiDL
Really appreciate how Raspberry Pi keeps making things easier for users. This looks like a solid improvement.
don isenstadt
I am currently running bookworm and when I click on the raspi imager icon I get a popup saying that there is a new version do you want to download? So I clicked that and it instructed me to type sudo apt install rpi-imager into the command window which I did but it came back with this:
rpi-imager is already the newest version (1.9.4).
so if it is not available for bookworm then please don’t keep putting up the nag screen every time I use it … thanks. Or if it is supposed to work on bookworm it obviously needs to be repaired.
thanks!
don isenstadt
don isenstadt
Sorry for posting the above comment .. after reviewing and running it on several different machines I’ve concluded it works just fine under startx but not under labwc on bookworm … I will go to the forums to have this addressed. The link just shows the sudo apt install but I do think it should say sudo apt update first.. just for people like me who forget it is important!
Tom Dewey — post author
I’m certainly able to run Imager 2.0 on labwc/Bookworm, though naturally I’d recommend Trixie as it’s the supported Raspberry Pi OS release at this time.
long
Sorry, I can Not agree this update is good. Beacuse I need load .img from local host and edit customisation before writing to TF card, this function is very import for me, but removed in imager 2.0.
Tom Dewey — post author
Unfortunately, that’s not correct.
Customisation requires labelling in 2.0, to prevent potentially dangerous customisation mismatches. The best way to do this is by using the Content Repository option in App Options. This mechanism is further covered on the GitHub issue tracker, #1302.
Steve Stewart
Complete newcomer to Raspberry Pi (and Linux and struggling to update to v2.
Currently running v1.8.5 and when I enter sudo apt install rpi-imager into the terminal it says I’m running the latest version. Not sure what I’m doing wrong but if someone could point me in the right direction?
Thanks
CreatedWithATrackPoint
Hey, what distro are you using, if its raspberry pi OS, then which version?
Tom Dewey — post author
Are you running the 32-bit Raspberry Pi OS? The 32-bit (armhf) version of Imager requires further engineering at this time – in particular, our dependencies have dropped support for armhf environments in favour of 64-bit (aarch64) only – so the testing burden is significantly larger.
Steve Stewart
Thanks for getting back to me and apologies for my slow response.
At this stage I’m using the stock (Bookworm) version of the OS that is bundled with the Pi500. However this is the 32-bit version which may explain my issue. Maybe an upgrade to the 64-bit version is in order.
Amarand
I experienced the same confusion with the capital city selector. As an American, “capital city” primes state capitals (Columbus, Sacramento, Albany) – we spend years memorizing those in school, not national capitals.
I expected timezone selection by major city (New York, Chicago, Los Angeles) like every other system uses. Finding only Washington D.C. listed was baffling.
Additional issues:
– The list is sorted by CITY name, not country, making it effectively unsearchable
– Multi-timezone countries need a timezone selector, not just capital city mapping
– The default selection (Abu Dhabi) makes no sense for most users
– The label “Capital city:” should be “National capital:” to avoid ambiguity
v1.9.6’s “Wireless LAN country:” with country codes was clear, standard, and worked perfectly. The regulatory domain requirement doesn’t necessitate this UI pattern – it just needs to map to country codes on the backend.
Every other system (Windows, macOS, Linux, Android, iOS) uses Country → Timezone. There’s a reason for that standard.
jordana
Will Imager downloaded during net install be ever upgraded? Customization of current Imager downloaded during net install is ineffective – hostname, username/password, wifi password all need to be entered again during first boot with latest Raspberry Pi OS. Happy to raise a bug about this if this is not how it suppose to be.
Tom Dewey — post author
Imager 2.0 is prepared for the Network Installer, but has been held back while I field feedback on the Desktop releases. As the Desktop feedback eases up, I expect to be able to release the Network installer.
Paul Hunt
Unfortunately this is useless – we’ve gone back to the old version.
After downloading and copying to the lab computer, which doesn’t have any Internet access for security reasons, where all the ISO’s are…the application just shows a blank screen.
There is no option to select any of the ISOs we used p reviously, or just write to an SD Card.
adoes
yeah nice interface but the process is sooooslow…like 10 x of the previous imager…not a fan.
adoes
oh and it only lists the capital of each country in the localisation. prev version had numersour options across timezones. yes I realise the timezone is in the next field.
dsul
I don’t see how to do a true headless install with this. I enable SSH in the imager wizard but when I boot the pi headless, it never show up in my router’s connected devices. I connect it to a monitor and then it connects to my wifi just fine. If I use the desktop to disable auto-login to desktop and console, then I am able to reboot headless, it connects to my wifi and I can ssh to it. Shouldn’t there be a setting in RPi Imager to disable autologin or somehow boot truly headless from scratch with SSH access?
NightPurrer
Hey.
I have a problem with the new imager.
I’m blind.
Whichever drive I select, I get a message saying that none has been selected and I cannot save the system image.
I using newest nvda and Windows 10.
Tom Dewey — post author
That’s not expected. Are you definitely selecting compared to highlighting? After moving your focus over a list item, you should press ‘Return’ to select the item – and that will also advance you to the next stage of the wizard.
Stu Allen
I wrote an image, selecting a temporary hostname since the new system was replacing an existing system with the same name. Now I cannot change the hostname on the new system. I have tried with both raspi-config and the desktop configuration utility. I check /etc/hostname and run the hostname command after making the change and they are right. I reboot and it goes back to the original name. How do I fix this???
Naruto Senki
This update to Raspberry Pi Imager 2.0 feels like the kind of improvement that actually solves real-world friction, not just adds new features for the sake of it. The move to a wizard-style interface is a big win — especially for beginners who often get overwhelmed by hidden menus or complicated setup flows. Putting OS customisation front and center makes the whole process far more intuitive.
The built-in Raspberry Pi Connect configuration is another game-changer. Being able to authenticate during imaging means first-boot remote access becomes seamless, which is huge for classroom environments, labs, or any headless setup workflow. Accessibility improvements also stand out: full keyboard navigation, proper screen-reader labels, and thoughtful use of contrast show that this version was designed with inclusivity in mind, not as an afterthought.
Overall, this feels like a mature, thoughtful step forward that respects both new users and power users. Kudos to the devs, testers, and translators — Imager 2.0 really elevates the first-time Raspberry Pi experience while still improving the workflow for longtime enthusiasts.
TooManyLard
It seems the developers have forgotten about PolkitAgent, and in my ArchLinux+hyprland setup I need a very primitive way to run Appimages using sudo(and still not working), even with hyprpolkitagent running.
Frank
This version is a huge step backwards. On a Mac, I can no longer easily delete previously used data. The old settings are always applied. The language settings are completely useless. The password isn’t recognized via SSH, rendering the program unusable.
I’m going to look for the old version; at least that one worked.
What a shame.
Dave Jesse
99% excellent, but is it me or do the menu option lists jump around? Each time I try to build HA, the sequence of alternative OSs seems different.
Daniel James
I’m using imager on Debian (Mate) on an AMD64 PC. The size of the .Appimage file is staggering, and around 60 times the size of the .deb files for the 1.x imager versions. Could we please have a .deb version (with Qt dependencies, as that seems to be what fills most of the space) as an alternative?
Tokuplay
Really impressive update, the new wizard interface and accessibility improvements make Raspberry Pi Imager 2.0 feel much more user-friendly and modern. It’s great to see how much thought has gone into simplifying the setup experience for everyone. For those who also like exploring smooth digital tools and resources, thetokuplay is another platform worth checking out.
Mladenj
An option to enable X11 and VNC in customization options would be nice.
Darryl Miles
RPI4/RPI5 always boot into blank screens here (BIOS works! no idea conservative why VESA modes are not used by default, until you have run textmode to perform config).
So I need to boot with SSH running that I can login with. Hmm but that feature was removed (the default username/password things).
Forced to to use this Imager but the process is no longer auditable, all locked behind GUI. This Imager need to generated archive files that can be manually examined, then manually extracted over stock images, that have auditable SHAs published online.
So this traded on security headache (default username/password concerns) for another (unable to personally manually audit how the initial boot image was sourced and modified the trust chain is broken, needs to be able to be personally verifiable, “trust us bro” is not a solution.
Darryl Miles
This AppImage is badly packaged, it doesn’t even run on a currently valid LTS linux system.
So the idea of an Imager has been poorly executed.
./imager_2.0.6_amd64.AppImage
/tmp/.mount_imagergLPKdN/usr/bin/rpi-imager: /lib64/libm.so.6: version `GLIBC_2.35′ not found (required by /tmp/.mount_imagergLPKdN/usr/lib/libQt6Quick.so.6)
/tmp/.mount_imagergLPKdN/usr/bin/rpi-imager: /lib64/libm.so.6: version `GLIBC_2.35′ not found (required by /tmp/.mount_imagergLPKdN/usr/lib/libQt6Gui.so.6)
/tmp/.mount_imagergLPKdN/usr/bin/rpi-imager: /lib64/libm.so.6: version `GLIBC_2.35′ not found (required by /tmp/.mount_imagergLPKdN/usr/lib/libQt6Core.so.6)
/tmp/.mount_imagergLPKdN/usr/bin/rpi-imager: /lib64/libstdc++.so.6: version `GLIBCXX_3.4.30′ not found (required by /tmp/.mount_imagergLPKdN/usr/lib/libQt6Core.so.6)
/tmp/.mount_imagergLPKdN/usr/bin/rpi-imager: /lib64/libm.so.6: version `GLIBC_2.35′ not found (required by /tmp/.mount_imagergLPKdN/usr/lib/libQt6OpenGL.so.6)
Darryl Miles
This whole imager concept would be better replaced with a website/wizard with the same options on a website. That simply generates a tar.gz file you can extract into bootfs.
Then everyone can use it, the tar.gz is overlayed into the original boot img and is auditable as a clean download/SHA signature from public sites, the extracted tar.gz is auditable by taking a look at the contents. Then we can configure SSH on by default with ‘pi’ and ‘raspberry’ default passwords if we want this, due to headless issues (no monitor on first boot, need to firmware update on firstboot, need to modify some esoteric config.txt value on first boot, etc…)