DIY home automation with Raspberry Pi
For 2025’s Official Raspberry Pi Handbook, PJ Evans created an entire feature exploring the world of Raspberry Pi home automation projects. We especially liked this one, which shows you how to take control of your home, and your privacy, with a Raspberry Pi 4.
Home automation is not only useful but can also be a great deal of fun, particularly when setting up cool automations or connecting different devices together in new ways. It can also help boost the energy efficiency and security of your home; there are a wealth of practical reasons to start experimenting with this technology. Although there are different vendor-specific automation systems out there, we prefer one that doesn’t ‘lock’ you into one provider. One such platform is Home Assistant (home-assistant.io), a free open-source operating system designed with flexibility and independence in mind. Home Assistant is a huge topic, but here we’ll look at the basics of setting up a server to get you started on your automation journey.

Prepare your Raspberry Pi
Although Home Assistant isn’t strictly an operating system in its own right, it is available as a Raspberry Pi image that significantly reduces the work a user has to do to get up and running. Home Assistant is intended to run on a Raspberry Pi as the sole service. It is possible to run Home Assistant alongside other apps and services, but we’re keeping to the true path here. Home Assistant works with Raspberry Pi 3, but we strongly recommend using a Raspberry Pi 4 for the best performance. You should also use a wired Ethernet connection for setup and to ensure reliability. Home Assistant is headless, so no monitor or keyboard is needed.

Write the Home Assistant image
Luckily for us, you can write the latest stable Home Assistant image directly from the Raspberry Pi Imager. Insert a fast SD card 32GB or more in size into your computer. In Imager, select Choose OS > Other specific-purpose OS > Home assistants and home automation > Home Assistant > Home Assistant OS 9.5 (RPI 4/400 or RPI 3, as needed).
You’ll now get a ready-to-boot image. Insert the card into your Raspberry Pi, make sure you’ve got a wired network connection, and power up. After a few minutes, try to connect to http://homeassistant:8123 in your web browser.

Initial setup
Time to grab your favourite beverage. You’ll see an initial setup screen stating that it will take about 20 minutes before you can proceed. Soon it will be automatically replaced with the first stage of setup. Provide your name, username, and choice of password. On the next screen, there will be some questions about the server’s location. It’s important to set this accurately if you want to take advantage of sun-up/down times. Finally, Home Assistant will ‘look’ around your network for any existing smart devices and let you know what it’s found. Don’t worry if something doesn’t appear, it will probably just need manual configuration later on.
Add integrations
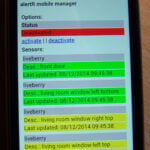
Home Assistant refers to smart platforms as ‘integrations’. For instance, if you have Philips Hue or IKEA Trådfri smart lights, it will add an integration for them and then a ‘device’ for each light it finds. It will also create a default dashboard for you based on what’s been found. Not all integrations can be found automatically, so you can browse available integrations and add them yourself or install third-party add-ons. Integrations include lights, security devices, media centres, printers, and mains power controllers —you can even make your own. At this point, it’s best to start exploring.

Customisation
One of Home Assistant’s greatest strengths is customisation. The dashboard system (‘Lovelace’) allows you to arrange your device control and set automations however you like them. By default, Home Assistant automates the layout, but we recommend you disable that. Click the three dots in the top right of the screen, followed by ‘Edit dashboard’. You’ll be asked if you want to take control of layout. Do so, and then you can create your perfect layout. You can resize, restyle, add graphs, tabs, and badges. Don’t be intimidated; start small and build things up as you become more familiar.
Next steps
Congratulations, you now have a running Home Assistant server. The capabilities of this service can seem overwhelming at times, but with a little reading on home-assistant.io and some digging around the menus, you’ll soon be taking control of your home. Once you’ve added the ability to switch devices on and off, or monitor things like printer ink levels, move on to Automations. These allow certain actions to happen based on events. For example, you can have a motion sensor turn on certain lights around the house. Check out Settings > Automations and have a play.
The Official Raspberry Pi Handbook 2025
Dive into the world of Raspberry Pi with this huge book of tutorials, project showcases, guides, product reviews, and much more. With 200 pages packed full of maker goodness, you’ll also find inspiration for your Raspberry Pi Zero 2 W, Raspberry Pi 4, or any other Raspberry Pi model you have — there’s something for everyone.


9 comments
Daniel Hamphery
This is a great breakdown of setting up Home Assistant on a Raspberry Pi! I like how it keeps things simple while still explaining the flexibility and customization options. Home automation can feel overwhelming at first, but this guide makes it seem much more approachable.
PJ Evans
Thank you. That was exactly what I intended.
Danny
No mention of any protocols in the article. Are you using Zigbee/zwave or matter and TCP/IP?
PJ Evans
The Tradfri system is recognised by HA, so no user knowledge is required of the underlying protocols. All Tradfri devices are using Zigbee and can be paired with any Zigbee hub.
DJ
” In Imager, select Choose OS > Other specific-purpose OS > Home assistants and home automation > Home Assistant > Home Assistant OS 9.5″
Using Raspberry Pi Imager v1.9.1 under RasPiOS or v1.8.5 under Windows10 I cannot see HA OS 9.5 offered for installation.
HA OS v14.2 seems to be the only option at the time of writing.
fnord
This article is quite old, HAOS 9.5 was released in January of 2023. Probably also why it’s suggesting the RPi 4 instead of the RPi 5.
PJ Evans
As fnord says, this article was published a little while back. I would recommend using the latest version of releases.
OldSurferDude
Just to get started, an RPi5 costs $130. On can buy a refurbished computer with the same or better specs for under $100 (including 3yr warrantee) Linux, Virtual Box, HA, and MQTT all work together. Step-by-step installation instructions exist.
RPi is great for doing bit-bang I/O, I2C, etc., but you don’t really want to be doing that at the same time your running your whole house.
By the way, the learning curve for getting Home Assistant is very, very steep. Even experienced HA users say that the documentation is difficult.
Chuck
Would like to use a pi to turn the stick on the window shades to open and close them automatically. I see using a photosensor and a servo. The programming is beyond me though.
Comments are closed